
Bad PHI disposal can cost a healthcare group from $125,000 to $2.25 million in OCR settlements. If I want to lower that risk, I need six things in place: a written policy, a full PHI inventory, a risk review for each asset, the right destruction method, chain-of-custody logs, and six years of records.
Here’s the short version:
-
PHI at end-of-life is still regulated
- Paper records, labels, wristbands, and fax sheets still count
- ePHI on laptops, phones, backup tapes, printers, copiers, servers, and cloud systems still counts too
-
I need to check retention before destruction
- HIPAA is only part of the rule set
- State retention laws and legal holds can stop destruction
-
Each asset needs a disposal decision
- Clear for some internal reuse cases
- Purge when recovery must not be feasible
- Destroy when media is damaged, high-risk, leaving control, or cannot be sanitized with confidence
-
Paper and electronic media need different handling
- Paper should go into locked bins and be shredded, pulped, pulverized, or incinerated in controlled settings
- Electronic media may need overwrite, secure erase, degaussing, cryptographic erase, or physical destruction
-
Vendors must be tightly controlled
- A signed BAA is part of the baseline
- Transport, subcontractors, loss procedures, and destruction proof all need to be spelled out
-
Documentation matters
- Log every handoff
- Track seal numbers, dates, methods, serial numbers, and certificates of destruction
- Keep those records for at least six years
If I had to reduce the whole article to one line, it would be this: PHI disposal is not a trash-room task. It is a compliance and data-security process that needs written rules, tracked custody, and proof that patient data was made unreadable and not reconstructable.
Quick Comparison
| Area | What I need to do | Main risk if missed |
|---|---|---|
| Policy | Set retention, destruction, training, and legal-hold rules | Inconsistent handling |
| Inventory | Track all PHI media and systems | Missed devices or records |
| Risk review | Assign Clear, Purge, or Destroy per asset | Wrong sanitization method |
| Paper disposal | Use locked storage and secure destruction | PHI exposed in trash or staging areas |
| ePHI disposal | Sanitize or destroy based on media type and reuse plan | Data recovery from devices |
| Custody and vendors | Log handoffs, control transport, require BAAs and proof | PHI loss during transfer |
| Recordkeeping | Keep logs and certificates for 6+ years | Audit and investigation gaps |
Below, I break these points into a simple checklist I can use for day-to-day PHI disposal risk management.
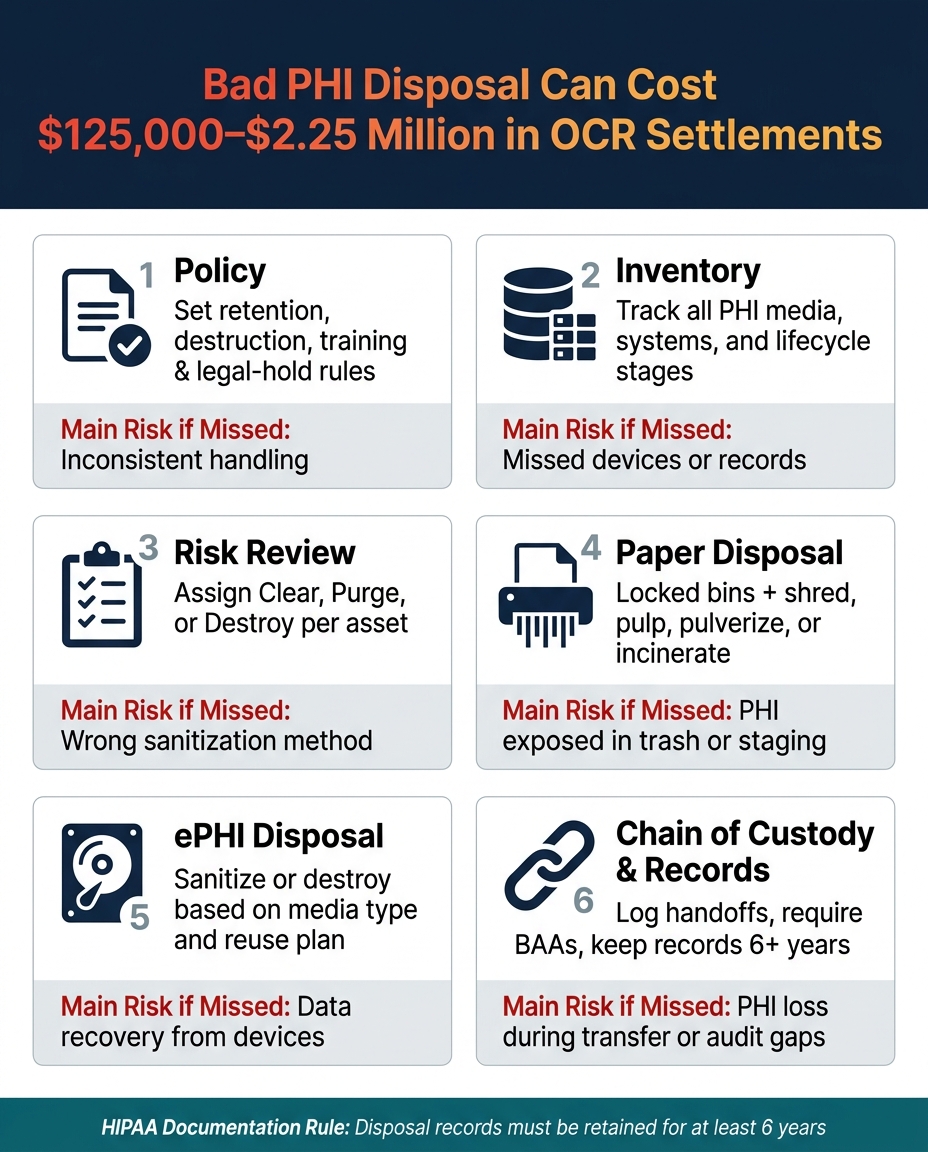
PHI Disposal Risk Management: 6 Core Controls at a Glance
Checklist: Governance, inventory, and risk assessment
Good disposal controls start with governance. That means clear policies, accurate inventories, and written risk decisions.
Verify a written retention and destruction policy
Create retention, destruction, and workforce-training procedures for every PHI media type.
Your policy should cover paper records, ePHI on endpoints, removable media, backups, archived systems, and returned remote-work devices. For each media type, match an approved destruction method to NIST SP 800-88’s three sanitization levels:
- Clear: Overwrite for controlled reuse.
- Purge: Sanitize so recovery is infeasible before internal reuse.
- Destroy: Shred, pulverize, or incinerate when devices leave control or hold high-risk PHI.[7][8]
The policy also needs to spell out what happens when PHI is under a legal hold. In plain terms: stop destruction during legal holds.
A policy on paper is only half the job. It starts to matter when every PHI-bearing asset is tied back to that policy.
Confirm PHI inventory and lifecycle mapping
Inventory gaps often begin with PHI-bearing assets that no one is tracking.[4][8]
A practical PHI inventory should include every system where PHI is created, stored, archived, or disposed of. For each asset, record the owner, location, media type, encryption status, and PHI sensitivity.[5][8]
Then map the lifecycle. This connects each asset to its disposal workflow, from creation to archival to final destruction. Without that map, you can’t reliably confirm that every PHI-bearing asset is sanitized before reuse, donation, vendor return, or recycling.
Use that lifecycle map to pick the disposal method in the next checklist.
Document disposal-specific risk assessments
A written policy and a full inventory still don’t do the whole job. Organizations also need written, disposal-specific risk assessments for each asset before making a destruction decision.[3][4][5]
These assessments should look at a few key things: media type, the chance of data recovery based on encryption state and sanitization level, physical location during staging and transport, chain-of-custody exposure between the organization and any destruction vendor, and legal hold status.[11][12] Each assessment should assign Clear, Purge, or Destroy and record why.
Policy, inventory, and disposal-specific risk assessments work together. They cut risk and help support sanitization decisions if anyone later asks, “Why was this asset handled this way?”
sbb-itb-535baee
Checklist: Secure destruction methods for paper and ePHI
Match each asset to the disposal method based on its assigned Clear, Purge, or Destroy decision. Before PHI leaves your control, it has to be made unrecoverable.
Paper PHI destruction controls
For day-to-day paper PHI disposal, use cross-cut or micro-cut shredders rated P-4 or higher. That includes items like printed medical records, billing statements, and lab reports.[18][19][20][21]
For large batches of archived records, vetted vendors can handle pulping or pulverizing. Those methods give more assurance than shredding alone.[1][2] Incineration should be kept for large or mixed batches that can't be shredded or pulped, and it should only happen in permitted, controlled facilities.[2]
Paper PHI waiting for destruction should stay in locked, tamper-resistant consoles or secured rooms until pickup. HHS is direct on this point: PHI can't be left in open trash cans, unlocked offices, or public corridors.[3][2]
Electronic media sanitization and device decommissioning
NIST SP 800-88 sets out three sanitization levels that map directly to devices that store ePHI.[7][13][14]
| Method | What It Does | Recovery risk | Reuse? |
|---|---|---|---|
| Clear | Overwrites all user-addressable storage locations using logical techniques | Low - protects against simple, non-invasive recovery | Yes, for internal reuse |
| Purge | Applies stronger techniques such as degaussing, secure erase, or cryptographic erase to make recovery infeasible even with advanced forensic methods | Very low - infeasible with state-of-the-art methods | Yes, for potential reuse |
| Destroy | Physically damages media beyond recovery, such as shredding, disintegration, or incineration | None | No |
For magnetic hard drives, Clear through multi-pass overwrite works for internal reuse in lower-risk cases. Use Purge when drives will leave organizational control. Use Destroy for end-of-life media or high-sensitivity PHI.[13][16][17]
For SSDs, old-school overwriting isn't dependable because of wear-leveling. A safer route is manufacturer-supported secure erase, cryptographic erase, or physical destruction through shredding or pulverization when reliable Purge tools aren't available.[8][15][16]
USB drives and other removable media may be Cleared for internal reuse. But if they're damaged, unencrypted, or used with high-sensitivity PHI, they should be Destroyed. Backup tapes should usually be Purged with degaussing or Destroyed at end-of-life, especially if they're moved off-site.[1][2]
This review shouldn't stop with laptops and servers. Include multifunction printers, copiers, and clinical devices with embedded storage too.[7][10][22]
When to choose destruction
Sometimes destruction is simply the safer move. Use it when media is damaged or malfunctioning, when a device is unsupported and can't run verified sanitization tools, when the PHI is high-sensitivity, or when the storage design makes reliable purging doubtful.
When any of those conditions apply, record the reason in the portfolio risk management assessment and assign Destroy as the required method.
After the method is set, control the handoff and keep proof of destruction.
Checklist: Chain of custody, vendor oversight, and documentation
With Clear, Purge, or Destroy already assigned, the next step is custody, vendor control, and proof. This is where many disposal programs get shaky. A custody gap isn't just paperwork gone wrong. It's a disposal risk, and every handoff creates another chance for PHI to leak.
Control access and maintain chain-of-custody records
Give each container or device that holds PHI and is set for destruction a unique identifier at the moment PHI is placed inside, such as a bin ID or box number. Then log every transfer with the date, time, location, container ID, seal number, quantity, and signatures.[25][37]
Keep containers in locked, restricted areas between collection and pickup. Use tamper-evident seals and record each seal ID. If a seal is broken or a container is missing, treat it as a security incident and document it on its own.[25][37]
Your log should also include the destruction method and date, along with the equipment used. That way, each record or device can be tied back to a specific destruction event.[24][4][28]
Require business associate and destruction vendor controls
If a vendor handles destruction, those same controls need to follow the PHI off-site. The BAA should require secure transport, trained personnel, and written loss-and-theft procedures during transport.[31][37] It should also state that the vendor must return or destroy all PHI when the contract ends within a set window, such as 30 days, and may not keep copies unless you clearly allow it.[29][30][33][34]
The same rule applies to subcontractors. If your vendor brings in another party, that subcontractor must follow the same disposal and documentation rules.[30][31][32] It's also smart to include annual audit rights for onsite or virtual walkthroughs of destruction facilities.[24][23]
Ask for a certificate of destruction for every disposal event, plus written certification that the work was completed. For electronic media, the record should list the manufacturer, model, serial number, organizational asset ID, sanitization method, and the exact technique used.[7][10] For paper, it should confirm the date, method, and the people responsible.[9][39]
Retain evidence for audits and investigations
HIPAA's documentation rule says disposal-related records must be kept for at least six years from the date they were created or last became effective.[35][36] That includes destruction logs, media sanitization reports, BAAs, vendor contracts, certificates of destruction, and disposal risk assessments. Keeping this material on hand helps with audits, investigations, and HIPAA documentation duties.
For high-risk devices or exceptions, add photos or screenshots of physically destroyed media or completed sanitization screens directly to the sanitization report.[4][40] Sometimes that extra proof makes all the difference when someone asks, "Can you show exactly what happened here?"
Store records in a searchable archive tied to policies and retention schedules. Make sure they stay readable even if your systems or file formats change over time.[26][27]
These records should be ready at any time for an audit, incident review, or policy check.
Conclusion: A practical PHI disposal risk management checklist
PHI disposal isn't just a records task. It's also a cybersecurity, compliance, and patient-safety issue. When disposal goes wrong, patients can face identity theft, and organizations can face HIPAA enforcement actions.[6][38] This checklist takes that risk and turns it into a clear operating model.
At a practical level, the checklist comes down to six controls: policy, inventory, approved destruction, chain of custody, vendor oversight, and six-year record retention - including vendor and business associate requirements under a signed BAA.[3][41][38] These controls work together. If one breaks down, the rest can start to wobble.
Effective PHI disposal depends on documentation, risk-based decisions, and regular review. The controls in this checklist - from retention policy to destruction certificates - need routine review and vendor monitoring to keep working as your organization's systems, partners, and data footprint change over time.[24][41][42]
FAQs
What counts as PHI in disposal?
For disposal purposes, PHI covers any health-related information tied to an identifiable person. That includes medical records, billing details, progress notes, lab results, imaging, and consent forms.
This applies across all media. So it’s not just paper files in a cabinet. It also includes ePHI stored on desktops, laptops, tablets, smartphones, servers, network storage, digital copiers or printers with hard drives, and external media such as USB drives, tapes, CDs, and DVDs.
How do I choose between Clear, Purge, and Destroy?
Choose the sanitization method based on data sensitivity and what will happen to the media next, using NIST 800-88 as your guide.
- Clear: best when the media will be reused inside a secure internal setting. It stops simple recovery methods.
- Purge: uses logical or physical methods to stop recovery, even during laboratory attacks.
- Destroy: physically makes the media unusable and unrecoverable at end of life.
What records should I keep after PHI destruction?
Keep detailed records of every PHI disposal action for at least six years so you’re ready for audits and aligned with HIPAA.
Your records should include:
- The date and time
- The personnel involved, plus any witnesses
- The destruction method
- What was destroyed
- Site details, if applicable
If you used a third-party service, keep its certificate of destruction. That document serves as legal proof.
